Lenovo ThinkCentre m720q Tiny 10T7 - Review & Commentary
Disclaimer
Part 1: General Usage & Linux
- Part 1.1: Introduction to the hardware and general observations regarding the SKU
- Part 1.2: Display woes
- Part 1.3: The Linux desktop experience
- Part 1.4: Gaming on Linux
Part 2: Windows, general gaming prowess, multimedia
- Part 2.1: The Windows 10 eXPerience
- Part 2.2: Native windows gaming performance
- Part 2.3: Emulation. HTPC capabilities
- Part 2.4: Conclusions. Part one
Part 3: The m720q as a Hackintosh
- Part 3.1: Preface and comparisons with a real Mac
- Part 3.2: Installing macOS
- Part 3.3: How to make HDMI work for real
- Part 3.4: The macOS Experience
- Part 3.5: Gaming on macOS
- Part 3.6: Conclusion. Part two
Part 4: Full conclusions. Who is this machine for
- Part 4.1: The story so far
- Part 4.2: Who is this machine for. Considerations
- Part 4.3: Who is this machine NOT for
Part 5: A note on mental health and burnout
Disclaimer
This originally started as a video script I have been working on for the better part of 2 months ( as of 18 of June 2020 ). After many issues getting the actual video part to happen ( such as an overabundance of capture, but not enough b-roll for parts I could not go back to ), and finally my video editor giving up on me. I decided that enough is enough. I have made a gigantic script, and I will just adapt it into an article.
As such, expect a lot of references to this being a video, and things that would reference footage that wouls appear on screen. I will eventually edit those out, but for now I will be copying the raw text and adding all the links the original script referenced, then I will be using still shots of my B-Roll and direct feed capture to complement all the visual elements that are referenced.
Also, you probably are here for Part 3.3. I know that by the time you're reading this macOS 10.16 will be out. I will update the segment when I have time and if I need to provide with a new table, I will provide both a table here and the neccesary files to get things working. Just give me time. I'm burnt out of working on this for so long and it will take a long while for me to finally adapt this
Even though I did not really manage to turn this script into a video, a whole lot of effort went into making this article. If you want to help and ensure I can still make crazy things like this. Please consider joining my Patreon, where early drafts of this script were posted, alongside the originally intended audio versions.
Part 1: General Usage & Linux
Part 1.1: Introduction to the hardware and general observations regarding the SKU
The Lenovo ThinkCentre m720q Tiny 10T7, or, just, the 720 from now on is a small, unassuming thin client and business box, for all sorts of home and professional settings where low power computing, with an equally small desk footprint, is required.
It is important to start with this statement, because this is a review about trying to know what this machine is, and what it isn't, and focusing on what it isn't, because we know what it is.
There are many iterations of this device, and Lenovo seemingly failed to fulfil their marketing promises for this machine. I was originally aiming for a much different machine, but due to the global pandemic's hardware shortage, I purchased the unit you see right now with the following specifications:
- -- A single module of 8GB of 2666MHz SO-DIMM DDR4 RAM running 19-19-19 timings. This has been upgraded to 16GB later on for dual channel purposes.
- -- A 256GB SATA III SSD provided by Micron
- -- An Intel Core i5 9400T, 6 core, 6 thread CPU, with 1.8GHz base and a 3.4 GHz boost clock
- -- No graphics solution besides the laptop-silicon based Intel UHD 630
- -- No Wi-Fi, No Bluetooth
- -- A proprietary PCI-E 8X connector
- -- No Thunderbolt ports, but a USB 3.0 type C at the front
Now, while these specs are relatively mid-range, we should note this is the HIGHEST SKU available at the manufacturer's website for my region. AND IT IS STILL BAREBONES
At the moment of writing this video, also thanks to the global pandemic, I have found myself to be unemployed, so I originally thought, based upon seeing board scans and the supplementary materials, that I could gather this SKU on the cheap, and slowly add items to it, such as the promised thunderbolt card, wifi, or a small iGPU. Turns out it is impossible for a multitude of reasons.
While the motherboard contains all the necessary connectors, and these parts appear in documentation as Customer Replaceable Parts, you can't order any of them
ThinkCentre M720 Tiny Platform Specifications
M720 Tiny Marketing Brochure
M720q User Guide and Hardware Maintenance Manual
This is specially infuriating, as the data sheet, service guide, and spec sheet mention these pieces of hardware that are quite literally unobtainable
Speaking of unobtainable, please beware of the following. Not only all the information on Lenovo's website is a lie, but the contents of the box are a lie. The SKU I bought is said to NOT include a mouse, a keyboard or vesa mounts, but it's supposed to come with a vertical stand. My unit came with the mouse, keyboard, and vesa mounts. The vertical stand was nowhere to be found.
If this type of machine interests you, and you would like some additional performance, your only choices are either make a Frankenstein machine, or try to find the unicorn that is the lenovo m920x with a GPU. Going from the Lenovo forum posts and retailers, it has an AMD RX 460, and some people comment that the built in usb c's are thunderbolt, but I can't find supporting evidence not even the manufacturer's own website. So, to all effects, the 920 does not have thunderbolt either, and no longer retails with a discrete GPU.
ThinkCentre M920x Tiny | System Configurator
Sometimes a listing of the GPU that would go with it appears on eBay, so we do know at least that part ( FRU 01AJ843 ) is not a lie, but they go for outrageous prices, and is honestly quite not worth it to go for it.
This is why claims that sometimes you can see on the Internet such as this being the ultimate Mac Mini killer, can be misleading. From what I can see, they are all using similar SKUs, so they are definitely not trying to make a 1:1 functional replica, and even then, on different markets, it seems to come with different configurations, so we're always comparing apples to grapefruits.
I spent nearly 3 weeks exchanging emails with the engineers over at Lenovo's “ South Support ” Department to discuss what could be done about this, and the conclusion we all arrived to was that I was essentially screwed, and my options were:
- -- Get the FRU 01AJ950, a daughterboard that adds a USB Type C connector with DisplayPort connectivity, plugging into the thunderbolt header of the motherboard, but not providing thunderbolt compatibility.
- -- Get FRU 01AJ937, a similar daughterboard that plugs into the same header, but provides only an additional DisplayPort output with no USB functionality
- -- Or get FRUs 01AJ902 or 01AJ929, PCI-E 16x and 4x, respectively, coupled with the larger GX20L29339 230W Power Supply, and expand the machine through a riser cable, and an external PCI-E card flopping around.
All of these were unsupported configurations by the manufacturer, and the engineer just mentioned I should get these FRUs through a third party, since at the end of the day, they could not provide any of these to me, due to my chosen SKU and being a particular customer and not a business.
On top of that, it was heavily implied, from my email exchanges, and some other conversations I've had, that there simply does not exist a thunderbolt card for the Tiny, both the 720 and 920, and that nothing really makes use of the proprietary PCI-E connector other than a network card.
While I do understand this is quite the information dump, I feel it's within reason to document all of this for future potential customers wanting to use one of these machines for miscellaneous projects, and how they will potentially get stuck with the configuration they get with no real expandability, despite the main board having working connections for everything else.
With all the technical things aside, we are now free to observe the machine. This small computer, when placed flat, is 179 mm wide, 36.5 mm tall, and 182.9 mm deep, If we open it, we can obserbe an internal clearance for cards no deeper than 155mm, and no wider than 55mm, we can remove the WIFI assembly bracket to allow cards up to 170mm in depth.. IO is fairly decent, with an USB 2 Type A, and a USB 3.0 Type C on the front, and the back being populated with the power connector, DisplayPort out, USB 2, HDMI out, another USB 2, two USB 3.0 ports, a Gigabit Ethernet port, and a blanked out plate on top where any existing expansion boards would go.
This computer IS absolutely tiny, and completely dwarves my main PC. This allows for a rather liberating desktop experience, where there is absolutely nothing in the desk, other than the display and peripherals. You can even screw it to your monitor with the included bracket, rather than hiding it behind the screen like I do. If it wasn't so power-constrained, I'd happily use this as my main setup. and I cannot wait for further miniaturisation of high performance components in the future
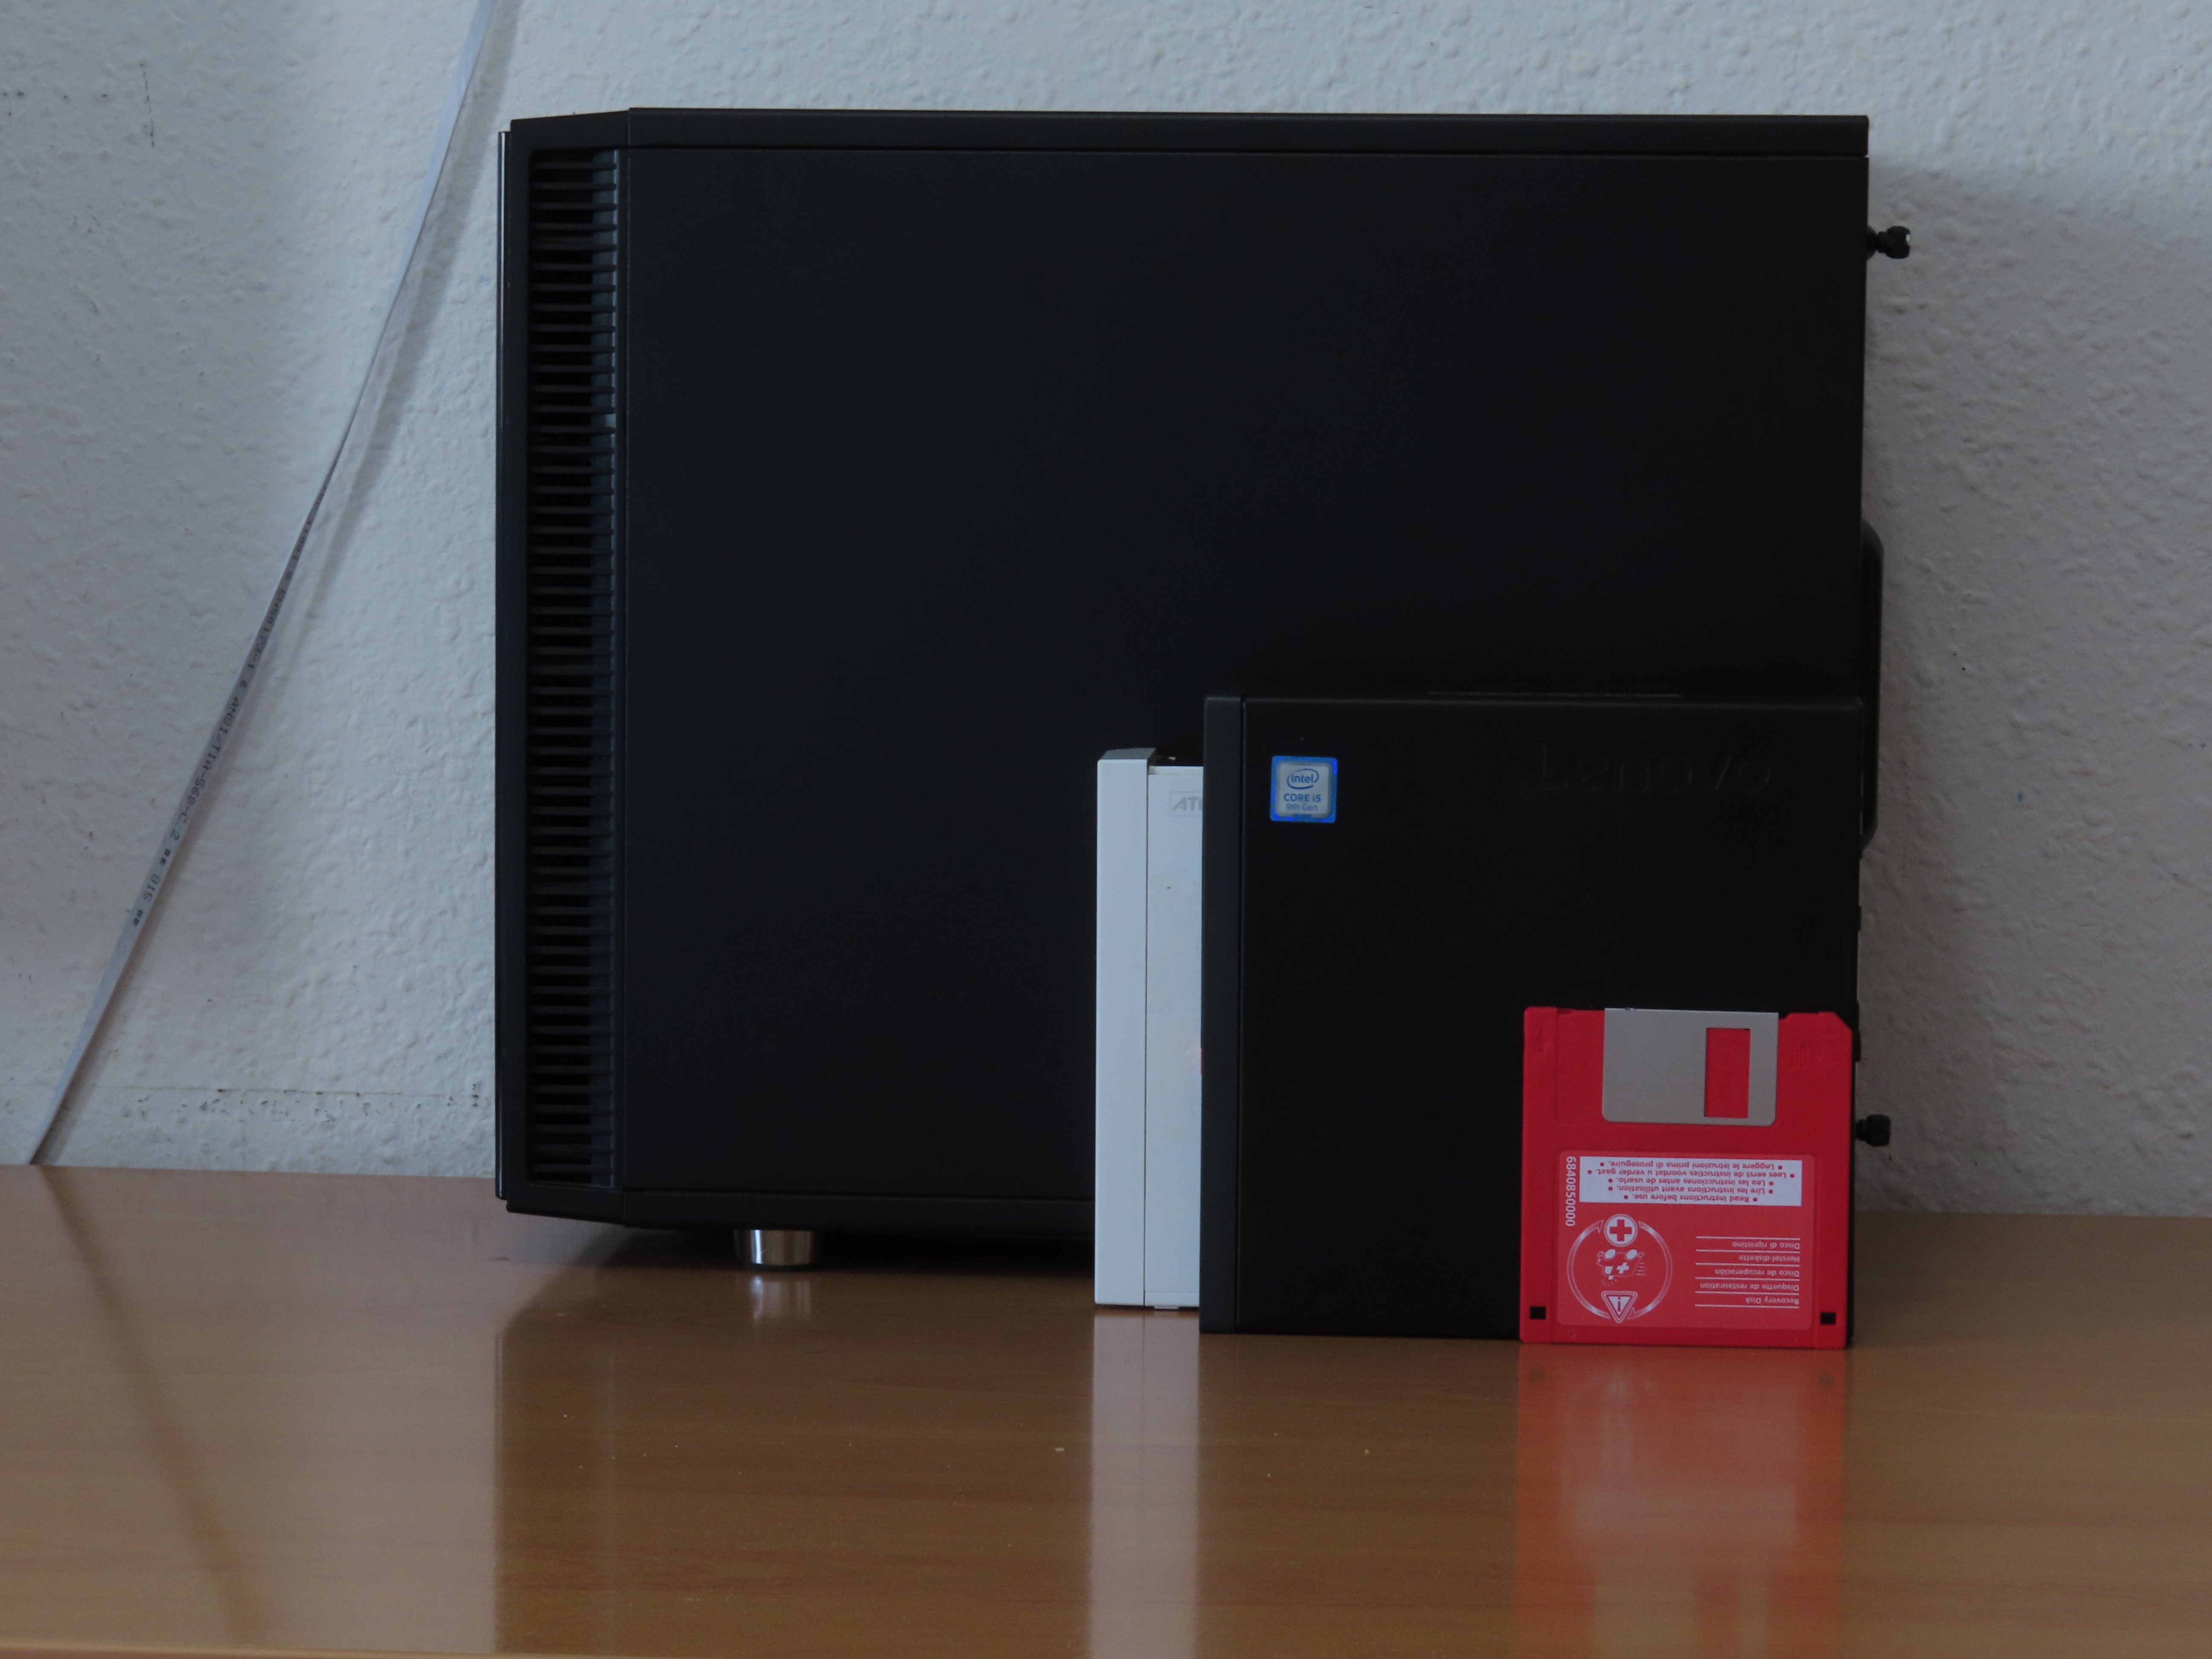
Pictured: My main PC ( Fractal Design Define Nano S mITX case ), a Nintendo Wii, the Lenovo ThinkCentre m720q Tiny, and a Floppy Disk stacked one directly behind of the other with the backs flush with eachother. The Wii exists solely to provide much needed white contrast to the image, as both computers would blend into eachother.
The 720 has opened my eyes to the viability of ultra-small form factor PCs, and this is something I want more of. If NZXT makes a successor to their current H1 case kit/computer, it's something I would definitely invest in in the future.
This pretty much finishes the specifications overview and the tour of the machine, so now we can proceed to talk about what it's like to actually use this thing.
Part 1.2: Display woes
The first consideration. This device is questionably meant for multi monitor support. Given we only have an iGP, it will theoretically run two 4K monitors, but if you are running the GPU with 8GB of RAM on single channel configuration only, you should be ready for a bad time. The Intel UHD 630 officially supports a framebuffer that shall not exceed 4096 by 2304 pixels, at 60 hertz, per monitor. However it seems like it can't cope with this under Linux. Intel Core i5 9400T Product Specifications
Even at this resolution, the system tends to lag input and scrolling is not as smooth as it could be, making this strangely choppy. Going to a single monitor setup greatly improves performance.
Clearly I am using a non standard display configuration and Linux is unhappy about it, but this is how I tend to work on a daily basis. All my problems came from a combination of Linux display management, single channel memory, and my strange setup. I still find it important to mention these.
The display woes under Linux do not end here. Ubuntu has a tendency to kill the HDMI port. I still don't know why it happened exactly, but I suspect it was some form of firmware injection. If you were to replace the cable from HDMI only to DP only, you'd find the following text on screen, complaining about an error on an audio device, and no signal what's however.
Part 1.3: The Linux desktop experience
If we stick to a single display, the performance is great. I've been writing part one of the script for this video under Solus and for this and web browsing it has been a delightful experience. It should't be a surprise, this machine is basically made for light tasks with a pinch of multitasking, and it shows.
Honestly, there is not a lot I can say in this regard, it's perfectly functional, without many hiccups or interruptions, besides the occasional stuttering. Audio refused to work, however, on every output but my USB mic, which surprised me as I never considered using it.
Other than a loud pop at power on, there's no noise or buzzing during normal operation. I am pleasantly surprised with this discovery, and I may make this my main headphone out from now on. It's still disappointing that every other audio out does not work. But I'll take what I can get.
All in all, mostly everything worked out of the box in Solus, and if we stick to things this machine is more than capable of doing, such as writing, exchanging emails, consuming media locally and through streaming services, it's a lovely experience. I am surprised to say that for once, Linux managed to work mostly decently after the initial hurdles. I have to give the Solus team props for making a worthwhile experience. It's stable, the DE is your standard GNOME-derived flavour, love or hate it, theming is absurdly easy, and this distro includes almost anything you would want from the get go
Part 1.4: Gaming on Linux
Gaming is also an important thing I want to test, since the size of this machine makes it a prime candidate for the living room, and chances are people will use this for gaming in some capacity. I have prepared a small set of benchmarks at 720p lowest settings to get a rough idea of how this machine performs in titles that work in both macOS, Linux, and Windows, because I am curious about the performance difference across multiple operating systems on the same machine.
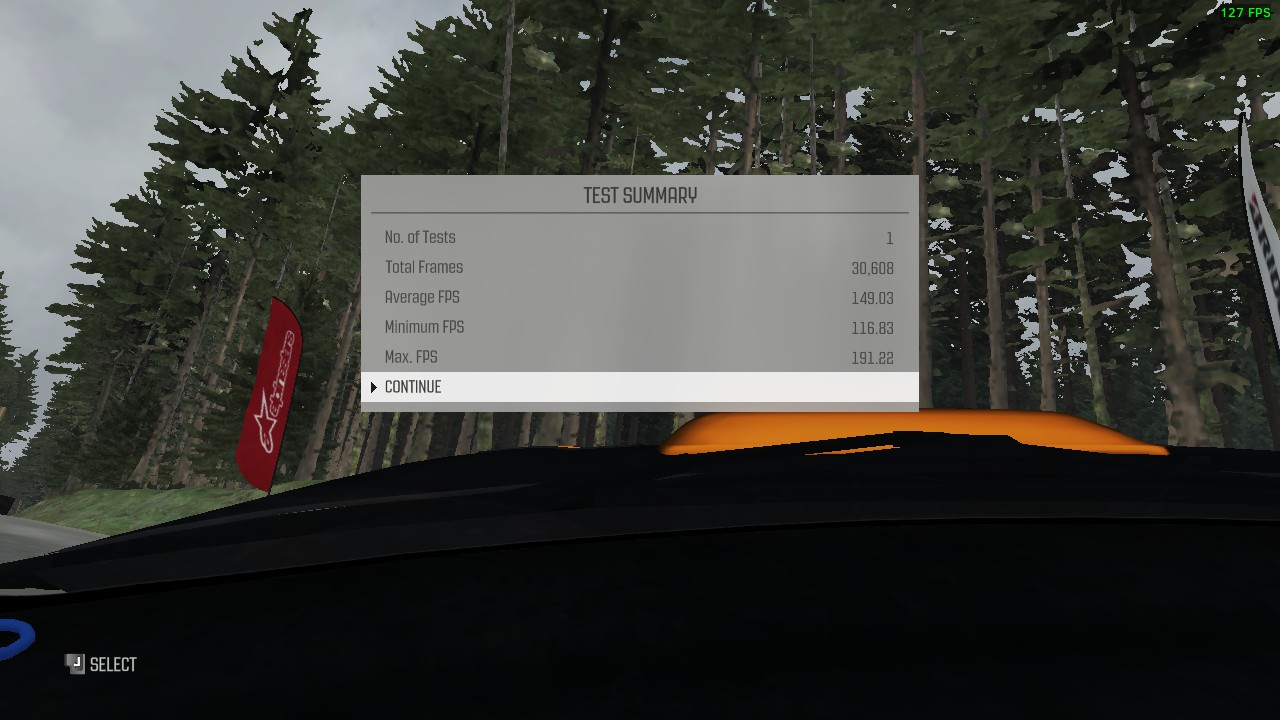
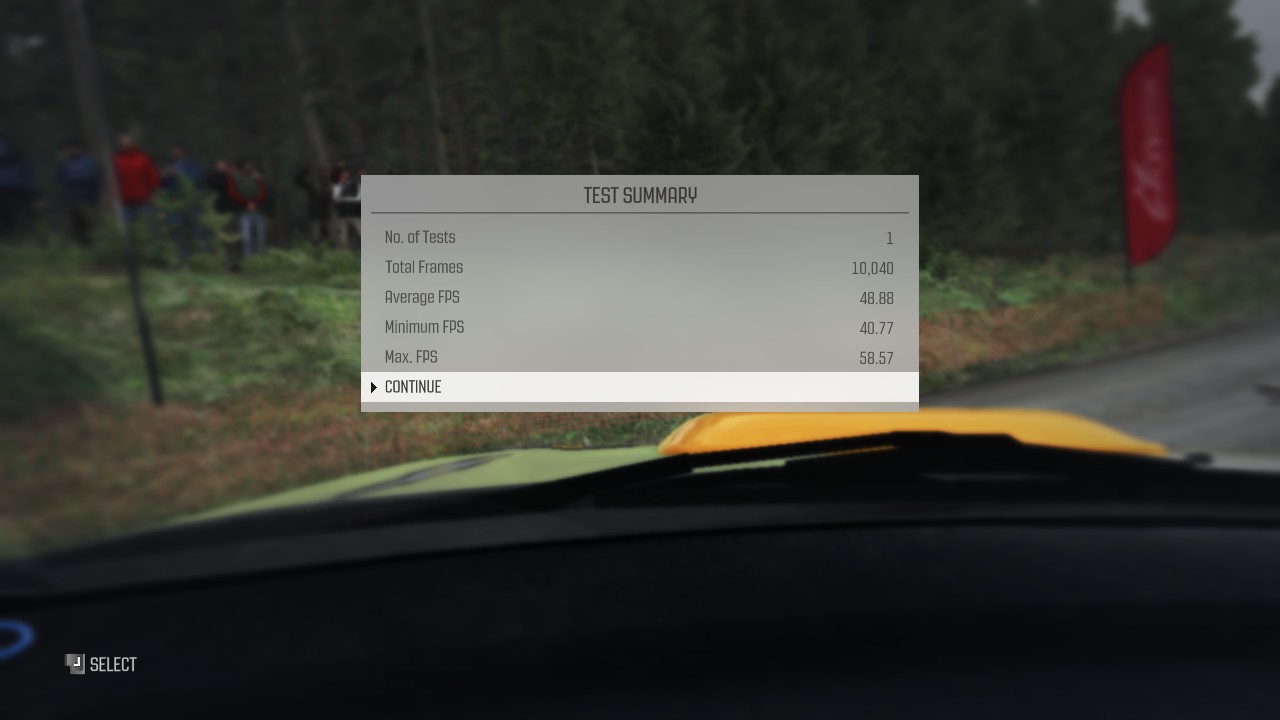
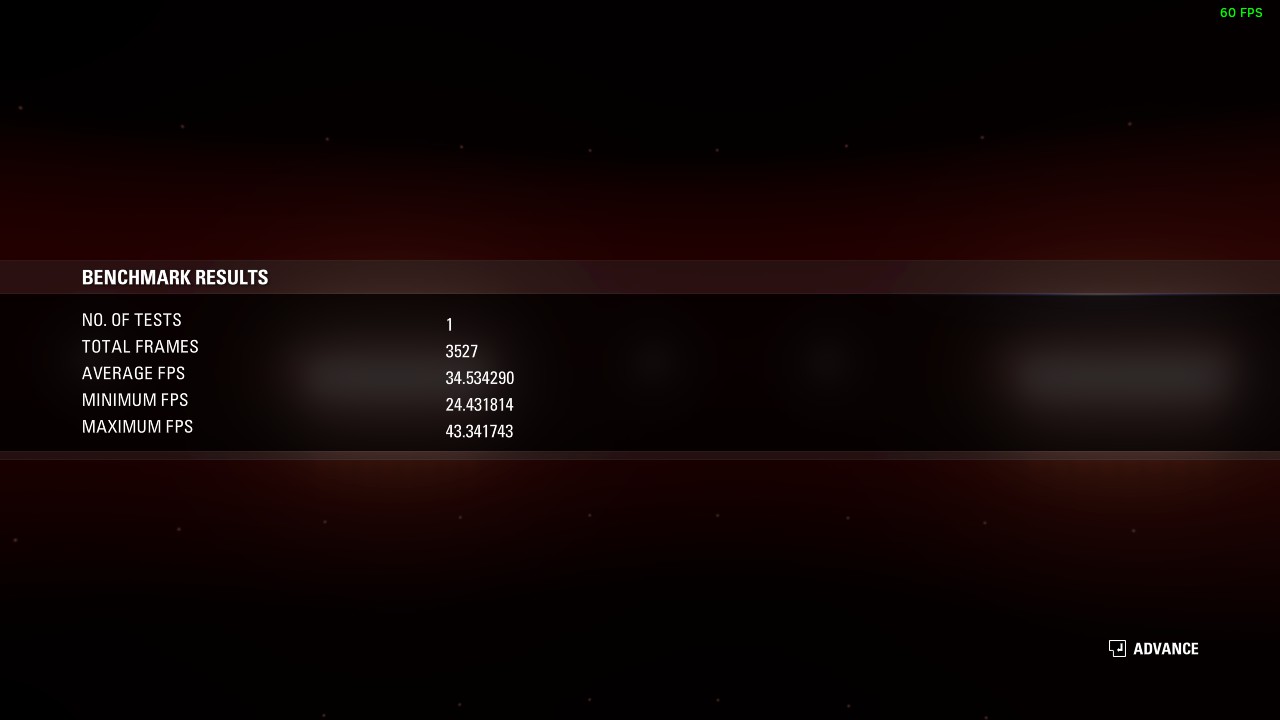
Everything will be tested at 720p unless stated. Since I got a RAM upgrade and I had to redo the tests twice, I'm just going to put a chart while I mention some observations here and there.
| Game/FPS | Minimum | Average | Maximum | ||||||||
| Dirt Rally ( Ultra Low ) | 116.83 | 149.03 | 191.22 | ||||||||
| Dirt Rally ( Medium ) | 40.77 | 48.88 | 58.57 | ||||||||
| F1 2015 | 21.431 | 34.534 | 43.341 | ||||||||
| F1 2017 ( Spain - Sunny ) | 25 | 32 | 41 | ||||||||
| F1 2017 ( Spain - Heavy Rain ) | 26 | 34 | 42 | ||||||||
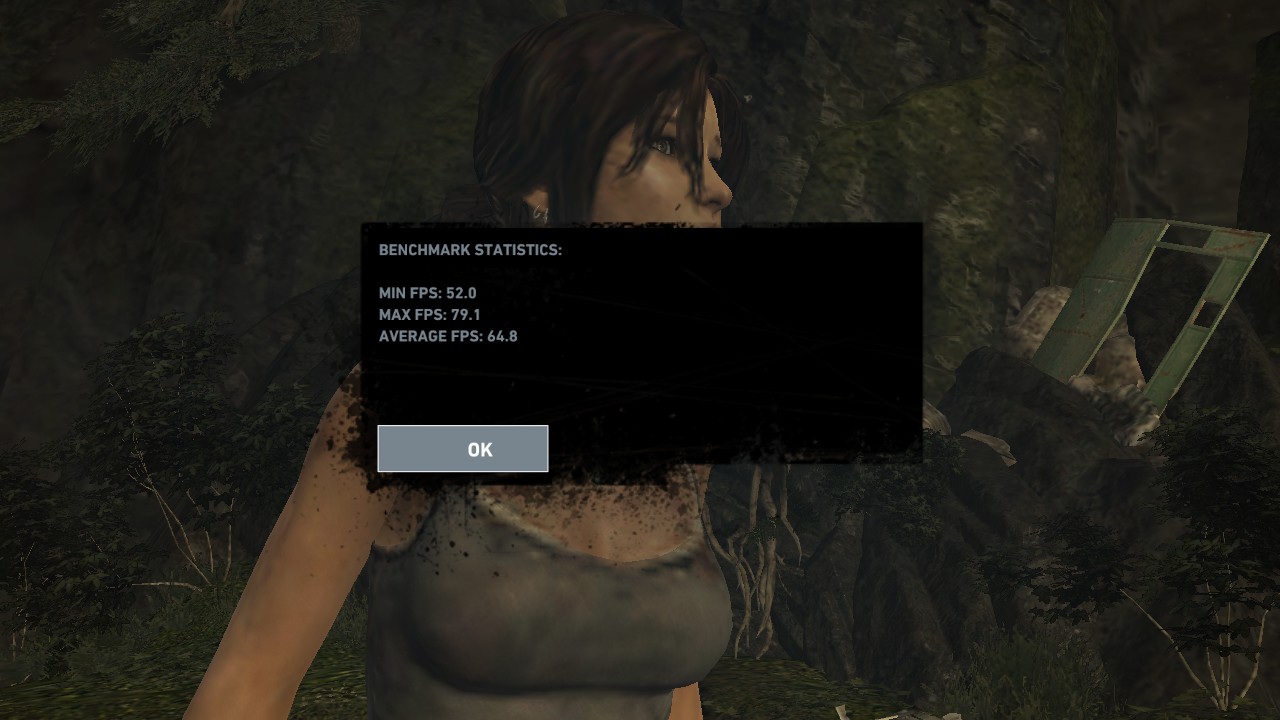
| Tomb Raider 2013 | 52.0 | 64.8 | 79.1 | ||||||||
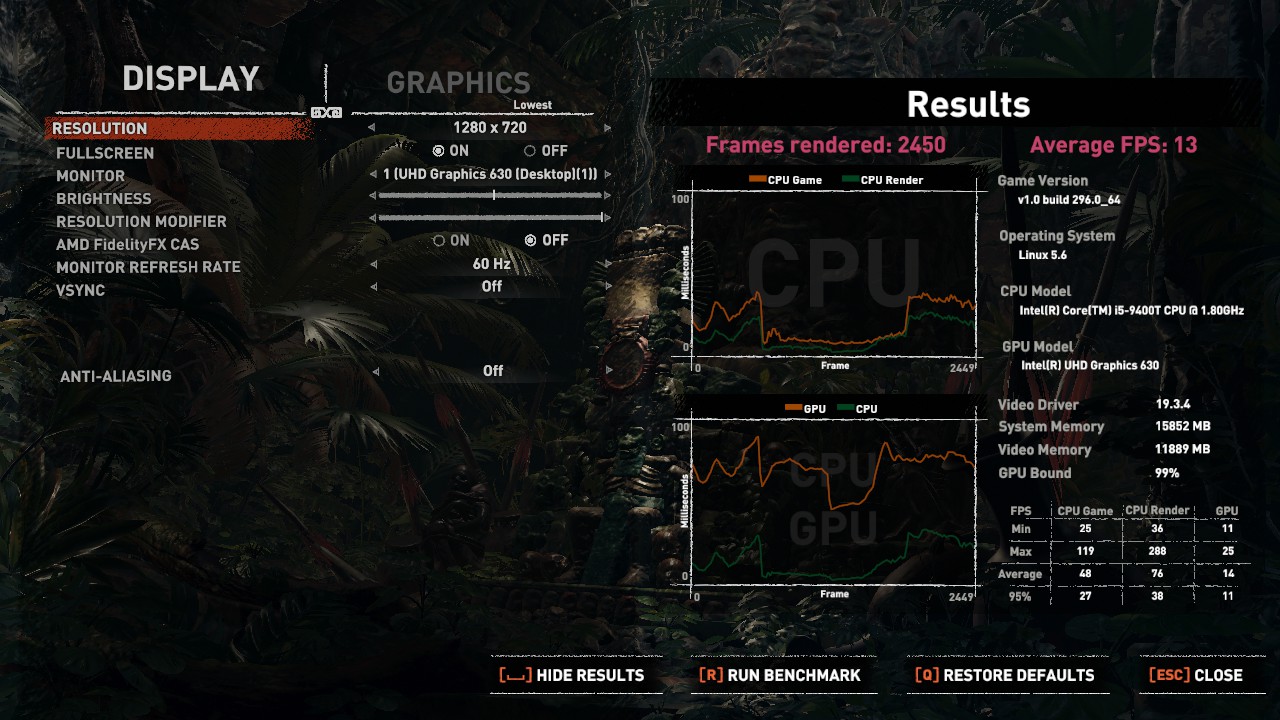
| Shadows of the Tomb Raider | NA | 13 | NA | ||||||||
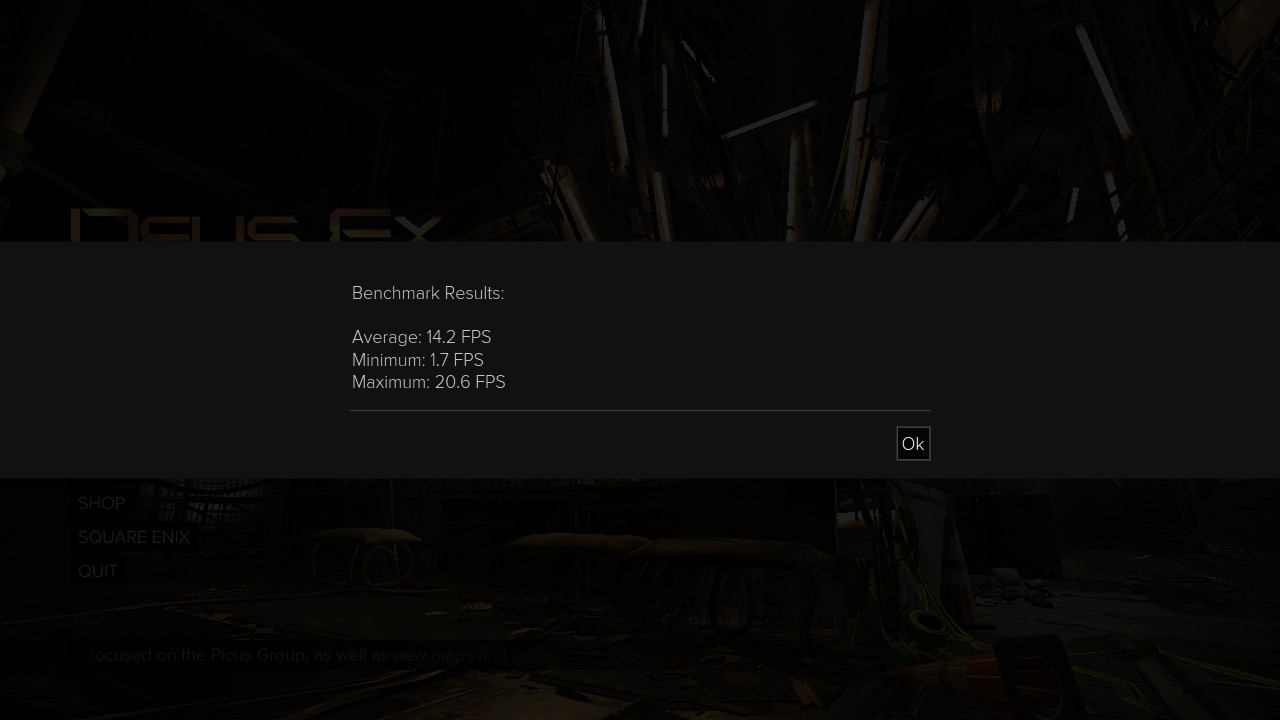
| Deus Ex: Mankind Divided | 1.7 | 14.2 | 20.6 | ||||||||
Things didn't go as planned for the original suite. Sleeping Dogs greeted me with a white screen, and Lutris refused to see the Steam folder. Hitman 2017, despite having a benchmark, had it nowhere to be found in the game, as it was a separate EXE in the windows version. Same story with Metro: Last Light - Redux. The benchmark is a windows executable and it doesn't exist in the linux port.
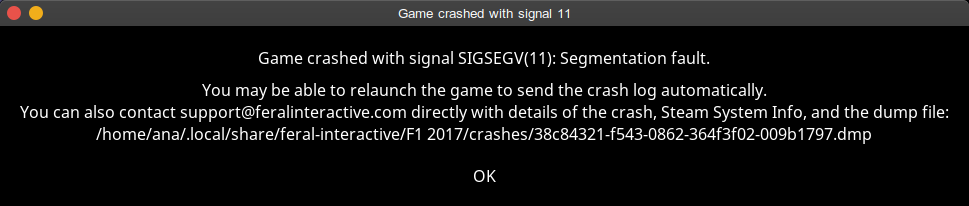
F1 2017, would outright SEGFAULT and not even boot. Nothing could be done about that until I upgraded the RAM.
Dirt Rally was an out-tier on this test. At the lowest settings, it can easily hold 120 frames per second or more. Going from the lowest setting to medium, yielded us one third of the performance. The most playable game of this review par none. And, unlike F1 2017, it didn't segfault with 8GB of RAM
Tomb Raider 2013 was one of the more playable games here, orbiting between 50 and 60FPS
Moving to Shadow of the Tomb Raider, we find some hilariously frustrating load times of 9 minutes to get the benchmark going. The price premium you're paying for clearly is for the ridiculously small form factor, and not for it's gaming prowess, but this is still a office work machine first and foremost.
To compensate for the lack of F1 2017, I ran F1 2015, the most recent previous release I own, But I then ran F1 2017 once I got the RAM kit, the results were acceptably low.
Lastly, Deus Ex: Mankind Divided gave us a similar result to Shadow of the Tomb Raider. With an FPS count that would barely reach two digits.
BallisticNG with retro graphics at 720p will easily reach and exceed 60 FPS, but at 1440p will oscillate between 28 and 40 FPS, with menus being unplayable. Hungry for more racing games I tried to open Burnout Paradise. Wine just spat this error and refused to load.
Next was Sky Rogue. at 720p it can reach 60 FPS, and at 1440p it hangs around the 30FPS mark, it seems to be unable to load workshop content from Linux though. I also tried Solar Shifter EX. At the lowest settings it'd handle itself at around 60 FPS, with some dips around 55-50 FPS.
I was going to check out Sonic Mania as my 2D game, but for some reason Steam performed a zero byte download, the file integrity checker says everything is there, then it just fails to locate the exe in the empty folder. With 2 other Operating Systems worth of testing I have decided to just move on.
It is not a surprise to absolutely nobody. Dual-Channel RAM increases performance. While gaming performance can vary from 2 to 20 more frames per second, depending of the game, at these frame counts, these are significative improvements. On top of that it is making the overall desktop experience smoother. A RAM upgrade should be the first thing on your list.
I also realised at the last minute that the steam built in frame counter eats between 1 and 5 frames per second, but I was not going to ready up all the benchmarks again, since i'm preparing the machine for part two. Just know that these results are in a slightly unfavourable situation, but the difference is almost negligible in games like Dirt Rally.
This essentially caps off the first video on the series. Next time we meet, we will analyze how it performs under Windows. and it's viability as a living room HTPC.
Part 2: Windows, general gaming prowess, multimedia
Part 2.1: The Windows 10 eXPerience
( You can tell I already had this joke for the video from the very beginning )
Seriously, it's windows. I hate it, and it needs no introduction. Windows on this machine is pretty straightforward, after all, this is what this device was made for, first and foremost, if not exclusively.
You cannot really optimize windows, no matter how they sell it to you. The way windows is built means that anything you forcefully remove will cause a domino effect of things not working, or things taking forever to do something before timing out internally. Two good examples come to my mind.
If you disable windows firewall, you'll find that the fonts folder has became unusable. Why the fonts folder and the firewall depend on each other, is beyond me. As a graphic designer and general artist, this was quite the head scratcher for a long while. Likewise, disabling the biometry service will kill the settings app because the users pane depends on that service. On a device that has no biometric hardware.
Windows 10 LTSC is not good either. It still comes the same background garbage as regular Windows 10, but, you will be stuck October 2018's feature set until Q3 2022. so no AMD Zen 2 support, WSL2 and so on. Performance on LTSC often times worse than vanilla 10 Pro.
If it were not because I am tied to this abusive relationship with Windows as a result of my video editing and graphic design suites, I'd move immediately to macOS, if the hardware would allow it.
I did perform some tweaking and I found idle utilisation was pretty much identical, with system tweaks and O&O ShutUp 10. It will definitely help by not sending telemetry data and stopping some tasks, but I don't think the impact is as big as advertised. Other than that, it's windows, you know what to expect.
For fun, i've also made a custom ISO with a handful of services removed. After tweaking it and disabling most of the background telemetry I've managed to shave around 300MiB of RAM. CPU usage remains at around 1% on idle. so not much has changed either.
Part 2.2: Native windows gaming performance
A positive of Windows is that it tends to respect the display resolution I set games to, unlike Linux, where 720p exclusive fullscreen meant 1440p, borderless, upscaled from 720p through the compositor. At least for most games setting exclusive full screen means, exclusive fullscreen. Like in part 1, everything will be tested at 720p unless otherwise stated.
Since we're on a Microsoft platform, I could not possibly start testing the games section without trying out the hottest Microsoft release… Forza Horizon 4.
With some effort you can coax it into run the benchmark, and, wouldn't you know, it's getting 25FPS average! It's no HFR gaming but it's pretty respectable. On top of that, LOOK AT THESE LIGHTS! YOU CAN DRIVE CARS WITH THE POWER OF THE SUN! This honestly made me laugh more than what it should. Arguably this can't be good for our IGP, but this was worth it.
Anyway. Because thankfully Windows 10 will run everything, we can jump straight to our table now:
| Game/FPS | Minimum | Average | Maximum | ||||||||
| Dirt Rally ( Ultra Low ) | 143.99 | 194.36 | 268.70 | ||||||||
| Dirt Rally ( Medium ) | 29.92 | 40.30 | 64.25 | ||||||||
| F1 2015 | 40.849 | 46.951 | 54.446 | ||||||||
| F1 2015 ( Stormy ) | 36.844 | 45.236 | 53.470 | ||||||||
| F1 2017 ( Spain - Sunny ) | 28 | 37 | 51 | ||||||||
| F1 2017 ( Spain - Heavy Rain ) | 29 | 40 | 57 | ||||||||
| F1 2019 ( Spain - Sunny ) | 29 | 36 | 41 | ||||||||
| F1 2019 ( Spain - Heavy Rain ) | 31 | 38 | 45 | ||||||||
| Tomb Raider 2013 | 74.0 | 94.2 | 116.0 | ||||||||
| Shadows of the Tomb Raider | NA | 18 | NA | ||||||||
| Deus Ex: Mankind Divided | 15.1 | 19.0 | 25.2 | ||||||||
| Sleeping Dogs | 33.7 | 38.7 | 47.6 | ||||||||
I am going to say this, I knew the tux tax was real, but I was not expecting Tomb Raider 2013 to gain 20FPS, or Shadows of the Tomb Raider to perform so much better. SOTTR is kinda weird because it didn't need 8 minutes to load the test scenes. The frame rate increase wasn't huge, but it's there.
Dirt Rally remains blazingly fast but performance actually decreased on medium settings. That's a weird one. But here we are.
On Windows, F1 2015 gives us a stormy variant of the benchmark, like 2017. However, unlike F1 2017, performance on the stormy benchmark decreases.
F1 2017 works just the same with the frame rate increase on heavy rain. F1 2019 behaves slightly better, and performance increases again on the heavy rain setting. The graphics are too good for being very low, so colour me impressed.
Deus Ex: Mankind Divided gets a healthy boost in performance compared to Linux, as expected.
Sleeping Dogs managed to run at a pretty playable framerate, if inconsistent. Not bad at all though.
Metro Last Light Redux and Hitman 2017 refused to work. I am greeted by a black screen on both and I need to log out to properly exit the games. Two out of two failed tests for these two.
I have also had some fun with Sonic All Stars Racing Transformed, it'll stick to 60FPS until you get hit with some projectiles or are too many particles around, then performance will tank, still, I love this game.
Likewise, Team Sonic Racing works just as well with the same issues, the Steam FPS counter says it was going above 70 FPS but it felt like it was dropping frames a lot, so there is that.
BallisticNG seems to force vsync if you set exclusive fullscreen. And it was locked at 60FPS all through both 1440p and 720p. An outstanding improvement over Linux.
Sonic Mania worked great on the GPD Win, works just as well here. Full speed in all gameplay scenarios. Shame about the way the special stages are laid out.
OK, we've done all the racing games you could possibly want to play in here. Let's kill some demons on the smash hit of the well beloved franchise that was gifted upon us on the 21st century.
Here is Doom 2004, running the time demo at 133.3 FPS average, with some scenes going over 300FPS and some dips under 80FPS, all of this at 720p ultra settings. We can kill demons at the highest visual fidelity possible, without forcing the game to become a smeary claymation mess, weird dynamic vertical resolution scaling forcing the game to play at 360 or 240p, and flat phong shaded polygons everywhere. We have hard lights, dynamic lights, particle emitters, stencil shadows, TEXTURES. We've got everything here folks.
And this is not all! In-Game it runs locked to 60FPS! There does not seem to be an option to enable/disable vsync here but it clearly could go higher than this. This is a great, dark and atmospheric horror game, and something I absolutely recommend everyone trying.
But sure, you don't want the Doom release from the first decade of the 21st century, you want the doom release from the 2010's! no worries! I've got you covered too!
Here is Doom 2012! Set to 120FPS Mode and with the graphics as high as the options allow. True to word, it stays at 120FPS and it looks just as great as Doom 3. With a shoulder mounted flashlight, to boot! You cannot go wrong with either of these, they both look great even today.
I have also tried this source port called RBDoom3BFG, and it made the performance tank SEVERELY, the graphics are prettier, the flashlight is basically useless, but I can't get more than 25-30 FPS out of this. The GitHub page clearly explains this exists to improve the graphics of D3, and if your PC can handle it, it's outright beautiful at times. Would recommend.
But I can already hear everyone typing angrily on the keyboards, You're not interested in any of this Doom 3 malarky, you want 2019 Doom as it was announced. OK. here we are.
Here is Doom… 1997, released in 2019 for the world to see, this former N64 exclusive is essentially Doom 3 on its pure form, and, seemingly, it's now the canonical Doom 3, so there is that! As you can expect it plays at 60FPS and it's an enjoyable experience through and through. Certainly playable, and you will certainly not have a shortage of demon killing on this system.
OK. There are not enough racing games, so here's Need For Speed Heat. I am surprised it runs at all. But here it is, swinging between 15 and 30FPS. I cannot say this is acceptable by any means, but it's impressive, nonetheless.
Burnout Paradise Remastered greeted me with yet another black screen. The good news is that we can play the original: At low, it works with a 60 FPS lock. I would absolutely play this one here.
And to finish off this native games compilation, since we are on windows, we cannot forget the open world action driving marvel that rockstar developed a while ago, and is a golden standard on it's genre, the grand Midtown Madness 2. The common ancestor toto Grand Theft Auto IV and V, and the entirety of the Forza series, on which we started the segment on.
At 1440p highest settings, with a truckload of mods, it still handles itself at 60FPS but with occasional dips below 30, unfortunately MM2 has never been very happy with modding and performance always tanks, even without mods.
MM2 was developed jointly between Microsoft Gaming Studios, and Angel Studios. After release, Angel Studios became Rockstar San Diego, and they took the Angel Game Engine with them. Once the Xbox launched, Microsoft Studios' team started work on Forza Motorsport. Most of the Microsoft-side developers for MM2 developed the first Forza, The art lead, Kiki Wolfkill, is credited in Forza Horizon 4, and as the Studio Head at 343 Industries, she now works mainly in the Halo franchise.
As for Rockstar's side? The AGE engine was used and improved in the Midnight Club games, then in 2006, after many iterative improvements, it got overhauled and became the RAGE engine, giving birth to Grand Theft Auto IV in 2008, and GTA V in 2013.
In a roundabout way, MM2 can be considered GTA 2.5, as it was released 13 months before GTA 3 proper, and it's heritage lives on in games like Realistic Horse Testicle Simulator Two.
Ok, this should be enough of a tour to see what kind of games does this run. Let's try emulators next.
Part 2.3: Emulation. HTPC capabilities
Outside of mainline gaming on steam, we shall never forget the vast treasure trove that is the back catalog of so many old systems. This machine will happily play anything up to the gamecube, with titles running at full speed using the standalone Dolphin emulator, as we can see here, Likewise, PS2 emulation works. I admit I don't know how to get the best performance out of PCSX2 as this footage shows, but I'm sure that at native resolution it will work fine.
You can definitely create shortcuts for dolphin games with parameters, and add them to steam BPM and this would kinda work as a gamepad-only PC with some caveats, Many emulators support command line arguments for individual games, so that would be my way to go for this.
I am well aware I'm not touching the subject much here, but if a Raspberry Pi IV can play anything up to the dreamcast, so this can, on top of handling GCN and PS2.
As a media center I can't really comment much. It works up to 4K, at 1440p it's playing everything i'd ever want it to play. I cannot comment more on this. I'm sure Kodi works great. But this is not really my use case. It can handle video quite well and that's more than enough for me.
Part 2.4: Conclusions. Part one
The Lenovo ThinkCentre m720q Tiny is a lovely piece of tech as long as you do understand it is primarily a business machine, made so people can work on documents without clutter on their desks. As mentioned in Part 1, the machine could theoretically be expanded to be more capable with a PCI-E riser, a beefier PSU brick, and a low power GPU that doesn't exceed PCI power limits. If we had that, it'd make for a killer tiny gaming rig, but sadly that's not what it is.
On the bright side it's still very capable of punching above its weight with some clear games that work perfectly, and anything old and 2D will still work perfectly.
For HTPC-like tasks, this is a machine I would wholeheartedly recommend, it's tiny size, power, and the included VESA mount means that basically anything under the sun with an HDMI or DP Input can become a killer multimedia machine. I will eventually revisit this if I find a GPU I can install here.
On the next part, we will talk about how the 720 performs as a hackintosh, and if it lives up to the claims of being a Mac Mini killer.
Part 3: The m720q as a Hackintosh
Part 3.1: Preface and comparisons with a real Mac
As we discussed on Part 1, on the internet, it seems like the Lenovo ThinkCentre Tiny series of computers are a popular target for hackintoshing. [one], [two], [three], [four], [five], most likely as a result of how comparatively similar they are to their respective generation of Mac Mini. On their own are definitely not bad machines, but there are many caveats you need to consider before jumping the shark for one of these devices.
Comparatively speaking, the SKU I own, 10T700AFSP would most resemble the current i5 Mac Mini on it's stock configuration, if albeit with a series of differences.
You don't have Thunderbolt 3 or 10 Gigabit ethernet. Could be partly mitigated by FRUs 01AJ902 or 01AJ929, which are PCI-Express brackets, and a TB card, or a 10 gig NIC. You do not have Bluetooth, or Wifi, though you could get a third party module installed. The Mini ships with an NVME SSD, on the Tiny, it's an optional expansion. The CPU clocks slower on the Tiny ( up to 1200MHz slower, comparing the maximum turbo boost speeds for each machine, with the same IPC, equaling in worse performance for the tiny)
The most important difference is the price. The Lenovo retails for 660 euros, while the Mac Mini retails for 1280. If you add a 16GB RAM kit for about 75 euros, and a 1 TB NVME SSD for 130, the total raises to 865 euros. If you wanted to have multi monitor support ( which, as I explained in part 1, i'd not recommend ). add another 65 euros for getting FRU 01AJ937 shipped to you. Totalling 930 euros.
While i'd say it's still 300 euros cheaper than the mini, I would honestly consider getting a legitimate Mac Mini at this point. You get 10 GBit ethernet, thunderbolt 3, built in wifi and bluetooth, a speaker that does not suck, and you don't need to deal with any of the extra steps needed in order to get the hack working, or the gruelling process of rebooting far too many times, with editing a file in between reboots, in hopes of finding the magic number that makes HDMI work.
Honestly, the many days I spent trying to troubleshoot my HDMI issue alone are more than worth the 300 euro difference. I would have definitely bought the Mac Mini, but now I am stuck with this for the foreseeable future until I am employed again.
This is honestly the sourest part of this video series, because ultimately, on top of fulfilling nginx/ftp/bit-torrent server duties, this was intended to be a Hack Mini. and it's so infuriatingly close, and yet so far, that it pretty much has destroyed me. With that said, we can now move on to make this massive disappointment happen.
Part 3.2: Installing macOS
For the most part, you should follow the Vanilla OpenCore Guide with a handful of exceptions where the guide does not apply to this system. I was originally going to document how to do the install process step by step, but it will be outdated by the time this is out, as new versions of OC come every month and their configuration files are largely incompatible with each other.
I will however will document how to get the HDMI working at last, after many weeks of frustration.
This is outlined in the guide already, but it's VERY IMPORTANT you create your AWAC DSDT file, without it the 720 will not boot otherwise. Other than that, yeah, you should be able to follow the guide directly, except for the DeviceProperties part of the guide.
Part 3.3: How to make HDMI work for real
This section on Device Properties right here. It took me one month, and avoiding getting to this part of the script for the best part of 3 weeks, but I finally did it, I found it. I found the way to make this work.
Look at this table. BURN THIS TABLE INTO YOUR EYES IF YOU WANT TO MAKE A HACKINTOSH OUT OF THIS PARTICULAR MODEL.
Key Type Value
PciRoot(0x0)/Pci(0x2,0x0) Dictionary 7 key/value pairs
AAPL,ig-platform-id Data 00 00 92 3E
framebuffer-patch-enable Data 01 00 00 00
framebuffer-con1-enable Data 01 00 00 00
framebuffer-con2-enable Data 01 00 00 00
framebuffer-con1-alldata Data 01 05 09 00 00 04 00 00 87 01 00 00
framebuffer-con2-alldata Data 02 02 0A 00 00 08 00 00 87 01 00 00
If we look at the Intel Ark page for the 9400T we can see that it says it's got a Device ID of 0x3E92. If we compare it with the WhateverGreen's Coffee Lake Connectors List we can see the information for device 3E920000, containing a LVDS port, and two displayport outs. This will come in handy later.
From my research on this machine, I can determine that the LVDS port is inside the BTB header where FRU 01AJ950 would live. If you don't have that FRU, con0 can be disabled. From earlier experiments using Hackintool, I determined that con1 was the DisplayPort output, meaning that con2 is our HDMI out.
This post over at tonymacx86's forums, while outdated, does provide some nice info, and explains in better detail how you can use Hackintool to figure out which of your conX ports are active at the moment, the text does not really 100% apply and the screenshots are outdated, but you should be able to get some additional context on how things work from here.
Who would have thought. At the moment of writing, the laptop OpenCore guide was definitely wrong here. But they've been changing key parts of the article after this article released. Big surprise. Still linking to this because it can come handy in some stranger edge cases.
Armed with this knowledge, let's go back to pci-root under DeviceProperties, and add the following:
On AAPL,ig-platform-id, we have to introduce our REAL device ID as we saw on ARK. So 3E920000 it is, but with each pair of bytes backwards, so it will be 00 00 92 3E.
After releasing this article I have been told by some members of the /r/hackintosh discord, that there is no reason why your iGP platform id should ever match your real ID, and since there's "no correlation" you should just key in "what should work". Regardless of how far off it is from your actual platform.
I say that's rubbish. All of it. The entire point of this journey is to chronicle the arduous process in which I suffered for two months, one of which dedicated to solve this stupid problem. A problem that did not work by RTFM and applying the reccomended values given for the desktop and laptop variants of the HD630.
What baffles me entirely is that ABSOLUTELY NOBODY wrote anywhere the importance of not lying and to write down your true IDs in the respective fields. But hey, you gotta call people incompetent when they follow the very guides they wrote and did not get the expected results. ( which is double-baffling because said people never bother to fully read this article, miss entire paragraphs and then just say whatever they want about my findings to do without reading. )
On top of that, this is an article that specifies configuration notes specific for the Lenovo m720q Tiny, and as i've mentioned before, and after, each machine will need specific keys applied. So it is NOT intended to be a generalistic guide.
Ultimately, I guess this keeps proving my point that everything you will find on the internet about solving hackintosh issues should be taken as just light suggestions, and you should just use the information you gather along the way to experiment, deduct, and document, as much as you can on your own. There is no magic one-button-solves-all solution, and a lot of manual labour is required.
A note on the device-id key, as CorpNewt kindly pointed out, setting device-id here is redundant. Port definitions rely on the ig-platform-id only, and 0x3E92 is a supported iGPU, and is technically no need to specify a patch for a fully supported chip. As things currently stand, there is no harm in stating the ovbious and keeping a device-id definition of 923E0000. However, this may lead in breakage in future releases of WEG and macOS, so i'd recommend not adding a device-id key.
To allow all of these changes, we need to tell WhateverGreen that it is OK for it to patch our framebuffer, so we need to create the data key framebuffer-patch-enable and set it to 01000000. Since we have determined that con1 and con2 are our only active ports on this machine, we will need the data keys framebuffer-con1-enable and framebuffer-con2-enable and also set them to one.
Lastly, we need to determine our connector types. We will be using the alldata format from the iGPU patching guide. For this we will need to create the data type keys framebuffer-con1-alldata and framebuffer-con2-alldata. Let's start with con1
We know con1 is our displayport output, and it's our second port, since this counts ports from zero, we need to set the port type byte as 01. The next byte needs to be a valid BusID, and for displayport, the legal values are 02, 04, 05 and 06. What works will probably vary from unit to unit, so you will need to experiment. I know that bus id 04 and 05 works for me, so I am going with 05 for our next set of bytes.
The next byte is the pipe ID, I am not exactly sure what this is about, but macOS always reports pipes 08 for con0, 09 for con1 and 0A for con2. since we are defining con1 here, our pipe will be 09.
The next byte pair is always blank in every single dump i've found, so it's staying blank at 00. Now we can move to defining the connector type. this one is easy. 00040000 tells the driver that con1 is a displayport connector, so we will go for that.
The next set of bytes are hardware flags, they probably configure details at a low level, and they vary from device id to device id. We will use the flags from our ioreg dump as they come.
And with this, con1 is defined. Con2 is more of the same: Connector 02, BusID 02, Pipe 0A, unused pair of bytes. Connector type set to 00080000 to inform it's an HDMI connector, and the dumped hardware flags.
BusID 02 is the ID that worked for me, but for other people it will be different, connector type HDMI's legal bus id entries are 01, 02, 04, 05 and 06, so you will need to reboot a handful of times until you get a correct combination.
With this done, go to NVRAM and on the boot arguments add igfxonln=1 to enable every port, and igfxfw=2 to forcefully inject Apple's GPU firmware. Thanks to at Random on discord for the tip.
igfxonln=1 is important because it will automatically force all the displays online, which means you don't need to turn off and turn on again the HDMI display every time you log in for dual monitoring purposes.
With this we will get HDMI working on our hack tiny. It's about as good as it gets.
I have spent way too much time trying to get this working, and I really, really hope this part of the video makes it easier to understand how to patch the framebuffer.
This fix seems to work for the Lenovo m920q with the i5 9500T, as it also has a GPU device Id of 0x3E92, however, this is not a magic bullet, and other Tinies have different CPUs with other GPU ID's inside them. However, the same deduction logic should hopefully apply to anything. Check your CPU's ark entry, compare your device ID with whatevergreen's dumps, examine your ports and set them up accordingly. this should at the very least reduce the amount of times you have to try again by a lot.
For the longest time the only solution I was given on the internet was "Just change the BusID's" without giving the issue more thought.
Hopefully, if you are a prospective buyer of this machine, or are having a similar issue, this small segment of this huge review will help you solve your problems. I spent too many weeks, and too many sleepless nights hacking away random numbers, rebooting 120 plus times, and yearning for a logical approach to this issue, and I finally found it.
On BIOS, it is important to set the GPU settings to Auto. If we had that fancy bracket and an AMD GPU, we could use the GEP option here. You will need to set it like this or you will not get video.
Whomever you are, wherever you are, I hope this information helps you in your journey.
Part 3.4: The macOS Experience
The macOS experience is just what you would expect. This machine is less powerful than the real mac it would compare to, but you would not be really be able to notice it. Here's the 720's geekbench 5 results compared with the real 2020 mac mini though, for your viewing pleasure, which keeps fueling my feeling that saving 300 euros on this machine isn't worth it. You get a slower machine, no bluetooth, no wifi, no fast ssd storage, but you do get a whole lot of broken promises and a huge space inside the chassis where a GPU could go but will never go because there are no compatible GPUs that'd fit here.
Other than that, if you're gonna be looking at buns, it's a good experience. When it's all said and done, you cannot really tell the difference between the real Mac Mini, and the Tiny. Audio works, there is no wifi or bluetooth to worry about, and after fighting to get the GPU to work fully, it works pretty well.
I also need to add. The awful performance of Linux Multi Monitor setups made me think the result would be just as bad elsewhere. Both macOS and Windows can drive both these screens with no problems at all. It's amazing. And something Linux should be ashamed of.
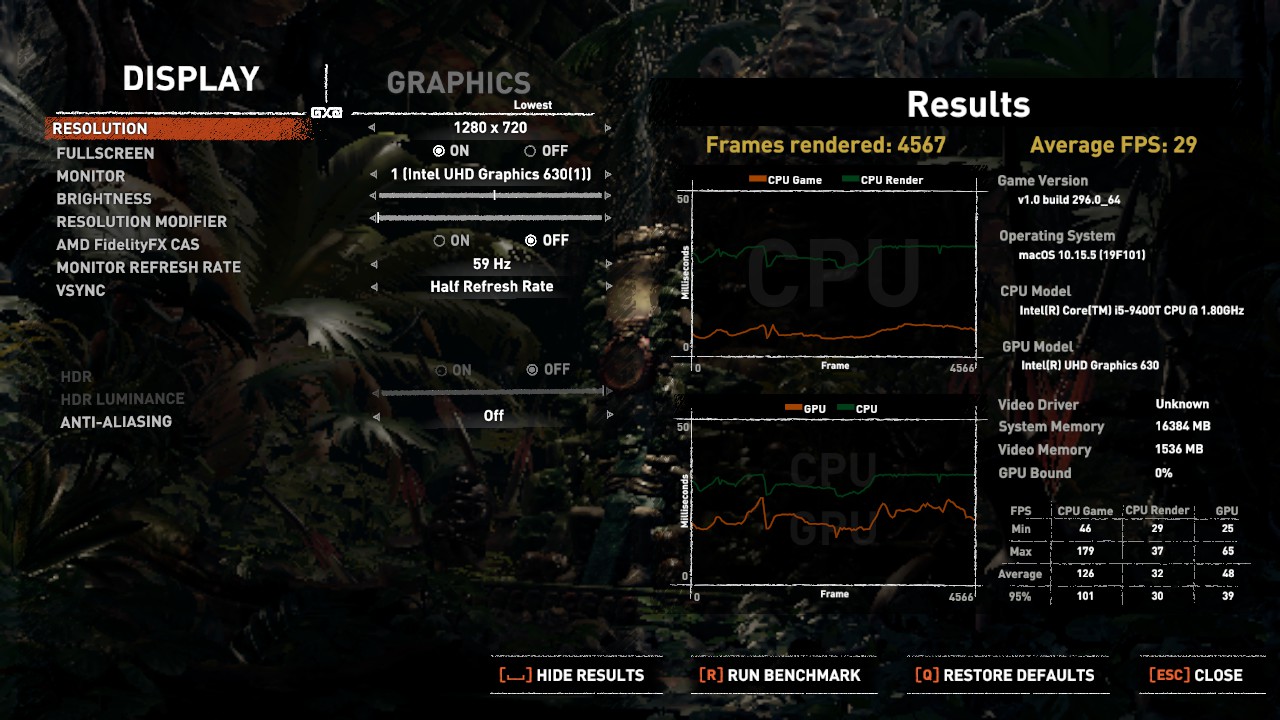
Part 3.5: Gaming on macOS
Even with good ports thanks to Feral Interactive, performance in macOS is pretty lame, and with a lot less to choose from. It is worse than it is on Linux. as the chart here shows.
| Game/FPS | Minimum | Average | Maximum | ||||||||
| Dirt Rally ( Ultra Low ) | 112.40 | 144.10 | 184.48 | ||||||||
| Dirt Rally ( Medium ) | 35.06 | 52.01 | 70.20 | ||||||||
| F1 2017 ( Spain - Sunny ) | 24 | 32 | 38 | ||||||||
| F1 2017 ( Spain - Heavy Rain ) | 25 | 35 | 45 | ||||||||
| Tomb Raider 2013 | 59.1 | 60.1 | 59.9 | ||||||||
| Shadows of the Tomb Raider | NA | 29 | NA | ||||||||
As we can see. Performance is expectedly mediocre across the board. HDMI output started to get temperamental again, and I was tired enough of reconnecting the cable and fiddling with the capture card, so I didn't capture footage for this, but here's some screenshots.
Tomb Raider 2013 performed expectedly worse, but Shadows of the Tomb Raider was surprising given it is the only game where resolution scaling was enabled by default, since the game already applied the lowest possible resolution, iI ran the benchmark, and, after an agonizingly slow load time, similar to how linux's, it got an almost 30FPS lock.
F1 performed predictably worse, it still gained 10FPS from the heavy rain setting, though. Dirt Rally is also special, because it's the only game here that forced me to benchmark it at 1024x768 anamorphic. With this blatant cheating, the game manages to perform close to how it would under linux, but not quite.
Conclusion. Part two
If you plan to use this as a hackintosh, get a real Mac, or a NUC. The NUC at least has thunderbolt 3 support so you can connect external GPUs, and the CPUs while being full-fat mobile chips, should not perform worse than the 9400T here.
Once you spend more than a month to get this working and know how to make it work on the first go, yeah, the performance is adequate with nothing being broken. But it's not mind blowing, and it's an outright disappointment after so many sleepless nights, weeks of research and more than a month to get this all together, Specially comparing it to the Mac it most closely resembles.
If you are here just because you want something that just works. Just get a Mac.
If you want to learn more about how the system works inside and want to go nuts trying to find why HDMI doesn't work, needs to be replugged after wake, and desperately trying to find passive, one slot, half width compatible GPUs, then be my guest. If you've gotten so far through this video, i've already done all the hard research for you.
The conclusion of this machine as a hackintosh is that it is perfectly mediocre. No more, no less. It will work for all the things it was meant to do.
And this is it for the OS specific parts of this review!
Part 4: Full conclusions. Who is this machine for
Part 4.1: The story so far
The Lenovo ThinkCentre m720q Tiny is a business machine intended for light desktop usage. At roughly 18 by 18 by 4 centimeters, it is the ideal machine to hide behind a desk, or screw onto a monitor using the VESA mount.
It's got some fairly low/midrange specs as we can see on the table here, but I upgraded the RAM to benefit from dual channel. The performance is a welcome boost, if not anything to scream for.
These series of computers are primarily made for business and home users that plan to use Windows, and it shows on the performance. Linux overall performance is awful, specially with two monitors. macOS despite the lower gaming performance, also responds much better than Linux.
The advertised thunderbolt 3 add-in card seems not to exist, and as configured, there is no wifi or bluetooth modules, though a slot is present. Present as well is a proprietary PCIE 8x connector and at the back of the board, a NVME SSD connector alongside traces and the silkscreen to mark a second NVME slot. Constant money bleeding and broken promises are the name of the game with the 720.
Part 4.2: Who is this machine for. Considerations
If you are someone who just wants a secondary machine that can do very light gaming on the side, or someone who seeks a tiny HTPC to have in the living room, this one is for you.
If you plan on making a web server, a NAS, or some other type of headless device, this machine will give you more than enough power, maybe too much power. I had to scale down my web server from this machine down to a raspberry pi, as a result of how under-utilized the damn thing was.
If you are a tinkerer at heart, and you're interested in a machine that can handle macOS without much fluff, but with a lot of prep work, this may be for you, if only for the learning experience.
Part 4.3: Who is this machine NOT for
Pretty much everyone else. The machine is serviceable as it is, and it's better than a lot of other hardware out there. However, at 700 euros for this configuration for this machine, performance per euro is NOT the question at play here. Since the machine is mostly intended to only serve as a desktop using a tiny form factor, that is the premium you are paying for.
If you're seeking to get a cheap intel based machine, just get most of the hardware needed in the second hand market, you can get anything from the 7000 and 8000 series range and get a better experience than this thing. AND you will be able to afford a GPU, a GPU that you will be able to fit, on your real case, of your very real computer, and not an expensive toy.
If you think this would kill the real Mac Mini, you will have a hard time with this machine. It does one third of what a mac mini does, costs just as much, and it performs 10 to 20% slower.
If you want a hackintosh that just works, this machine is not it. While once it's all up and running it can be considered reliable, all the prep work needed is just not worth it. Anyone who remembers my GPD Win first generation review will know, I care the most for the out of the box experience, and getting things to work with minimal tweaking. Trust me, all the issues I encountered along the way were not worth it, and the hope the manufacturer gave me that I could maybe expand this machine is the only reason why I've continued to press on, only to find, that while technically true, it's just unviable.
And it was not worth it. Just get a Mac, seriously.
On my GPD Win video I mentioned I was not the target demographic for this machine, and I can say for sure that I am not the target demographic for the m720q Tiny. Since this is a PC, it's worth exploring what It can and cannot do, and the point still stands. This is first and foremost a business windows machine, anything that does not match those descriptors is an unfit task for the 720.
Get a Mac, get a NUC, or get an ITX build from second hand hardware, either option is better than this complete and utter disappointment.
This video finally concludes, or starts, depending on how you're watching it, the review of the Lenovo ThinkCentre m720q 10T7, a computer, that if I had to summarize in one sentence, would be “So close, and yet so far.”
Thank you so much for sticking through this whole series, and don't forget to subscribe for more videos like these. Also check out my Patreon, where on top of early releases of videos like these, you also get early access and sources to all my graphic design related things. See you in the next video!